Application development frameworks like SpringBoot have done a good job a giving developers a quick start to developing applications with Java. Layering object-relational mapping to SQL to remove proprietary syntax has further simplified the development of database applications.
CockroachDB allows developers to take advantage in the evolution of globally distributed data with a simple SQL interface. But each database can bring it’s own specific syntax and cause developers to hesitate when getting started with a new database.
How do you get started?
This blog will use SpringBoot, Hibernate, JAVA, and Gradle to show a simple end-to-end solution with CockroachDB.
Demystifying CockroachDB Datasource
If you have developed an application with Postgres, developing with Cockroach will be a breeze. CockroachDB was written to be compatible with the Postgres 9.6 dialect. The connect string URL used to connect to CockroachDB is plug compatible with JDBC drivers for Postgres. This allows you to use various to tools like dbeaver to connect and run various SQL statements.
For ORMs like Hibernate, you connect just like you were connecting to Postgres. Currently, Hibernate is compatible with PostgreSQL95Dialect. So to connect to CockroachDB, the following should be configured in the application.properties file with SpringBoot:
spring.datasource.url=jdbc:postgresql://localhost:26257/defaultdb?sslmode=disable
spring.datasource.driver-class-name=org.postgresql.Driver
spring.jpa.properties.hibernate.dialect=org.hibernate.dialect.PostgreSQL95Dialect
That’s really it!
The rest of this blog will walk you through the steps with SpringBoot quick start.
Step 1: Quick Start with SpringBoot
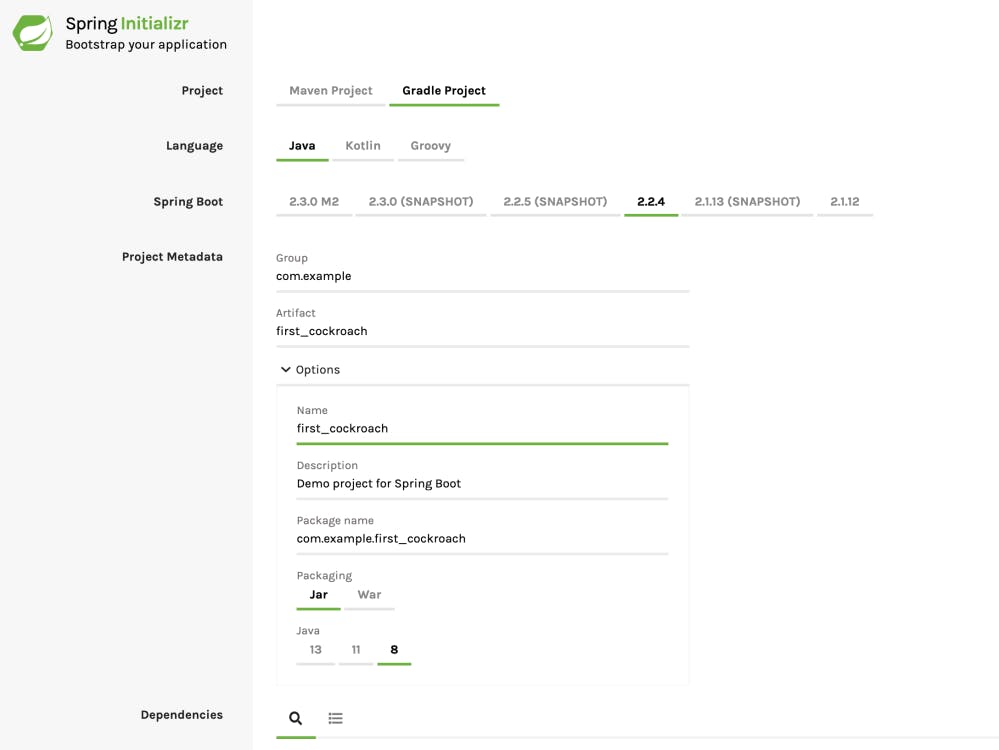
Open the quick start to create the basic framework required. For this example used the following options:
- Project: Gradle Project
- Language: Java
- SpringBoot: 2.2.4
- Project Metadata
- group: example.com
- Artifact: first_cockroach /w Options…
- name: first_cockroach
- Description: Demo project for Spring Boot
- Package name: com.example.first_cockroach
- Packaging: JAR, Java 8
The page should look like so:
Select the hamburger drop-down under dependencies to add the following items:
- Developer Tools
- Spring Boot DevTools
- Lombok
- Web
- Rest Repositories
- SQL
- Spring Data JPA
- Flyway Migration
- PostgreSQL Driver
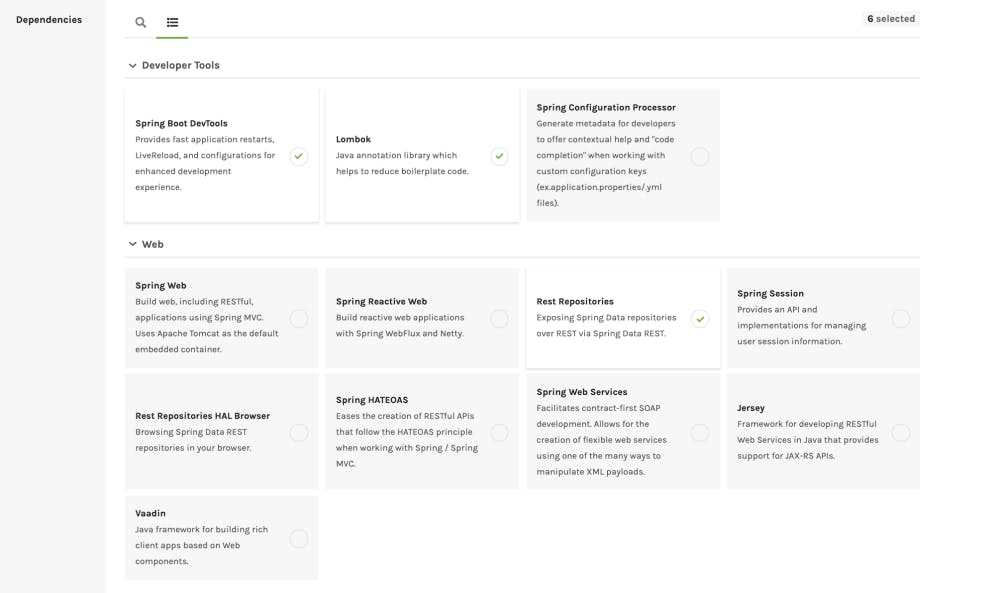
and...
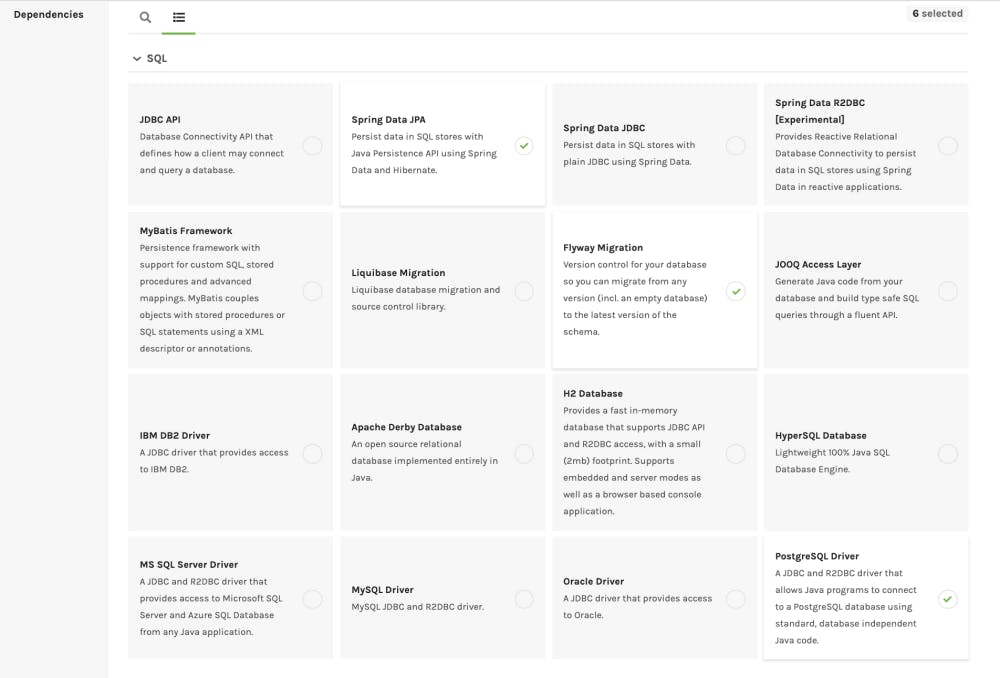
Once these are selected, you can simply click to generate the quick start package. If you use the artifact name above, you should have a first_cockroach.zip file to get started.
Step 2: Unzip Artifact and Add Connectivity Resource
Unzip the artifact created in Step 1 in your working environment and navigate the to src/main/resources directory. Once in this directory, create the application.properties file that defines how to connect to the database and migrate data with flyway.
### Setup Postgres driver
spring.datasource.driver-class-name=org.postgresql.Driver
spring.jpa.properties.hibernate.dialect=org.hibernate.dialect.PostgreSQL95Dialect
spring.datasource.username=root
spring.datasource.password=
spring.datasource.type=com.zaxxer.hikari.HikariDataSource
### Connect URL for localhost with port 26257 /w insecure connection
### Database name is defaultdb
spring.datasource.url=jdbc:postgresql://localhost:26257/defaultdb?sslmode=disable
### Set baseline-on-migrate with Flyway
spring.flyway.baseline-on-migrate=true
### Set baseline-version for Flyway to execute migrations at version 1 or more
For this simple test, I created a simple cockroach test cluster on my laptop. For an even easier demo cluster, you can simply run cockroach demo.
Step 3: Create Flyway Migration File
Simply create the appropriate flyway migration files in the src/main/resources/db/migration directory. For this simple test, I created a file V1__AddPetsTable.sql to create and populate the pets table.
--##
--##     Flyway Migration File
--##         src/main/resources/db/migration/V1__AddPetsTable.sql
--##
--## Create pets table
--##
CREATE TABLE pets
(
id UUID DEFAULT gen_random_uuid() PRIMARY KEY,
name STRING,
type STRING,
indoor BOOLEAN DEFAULT TRUE
);
--##
--## Define the herd
--##
INSERT INTO pets (name, type)
VALUES ('tula', 'cat'),('ruby','dog'),('rosie','dog');
INSERT INTO pets (name, type, indoor)
In a typical project, this is where Cockroach specific syntax is used to define tables and indexes to utilize features like Geo-partitioning, Duplicate-Indexes, and Inverted Indexes.
Step 4: Entities, Controllers, Repositories, and Services
Spring will have created the src/main/java/com/example/first_cockroach directory with the FirstCockroachApplication.java file as a starting point for this project. Within this directory, create directories to be used to define various objects and services.
cd src/main/java/com/example/first_cockroach
mkdir entities
mkdir controllers
mkdir repositories
mkdir services
Step 5: Create Entities for Pets
Now the table is defined it we can create an object that maps to the pets table. Create the Pets.java file in the src/main/java/com/example/first_cockroach/entities directory.
//
// Pets.java
//
package com.example.first_cockroach.entities;
//
import lombok.Data;
//
import javax.persistence.Entity;
import javax.persistence.GeneratedValue;
import javax.persistence.Id;
import java.util.UUID;
//
@Entity(name = "PETS")
@Data
public class Pets {
@Id
@GeneratedValue
private UUID id;
private String name;
private String type;
private Boolean indoor = true;
}
Step 6: Create Controller for Pets
This controller defines how to insert data into the pets table via a restful controller. Create the PetsController.java file in the src/main/java/com/example/first_cockroach/controllers directory.
// PetsController.java
//
package com.example.first_cockroach.controllers;
//
import com.example.first_cockroach.entities.Pets;
import com.example.first_cockroach.services.PetsService;
import org.springframework.data.rest.webmvc.RepositoryRestController;
import org.springframework.http.ResponseEntity;
import org.springframework.web.bind.annotation.RequestBody;
import org.springframework.web.bind.annotation.RequestMapping;
import org.springframework.web.bind.annotation.ResponseBody;
//
import javax.servlet.http.HttpServletRequest;
import java.net.URI;
//
import static org.springframework.web.bind.annotation.RequestMethod.POST;
//
@RepositoryRestController
public class PetsController {
//
private final PetsService petsService;
//
public PetsController(PetsService petsService) {
this.petsService = petsService;
}
//
@RequestMapping(method = POST, value = "/pets")
public @ResponseBody ResponseEntity<?> createPets(@RequestBody Pets pet, HttpServletRequest request) {
Pets createdPet = petsService.save(pet);
//
URI createdUri = URI.create(request.getRequestURL().toString() + "/" + createdPet.getId());
return ResponseEntity.created(createdUri).body(createdPet);
}
}
Step 7: Create Repositories for Pets
This controller defines how to lookup data into the pets table via a restful controller. Create the PetsRepository.java file in the src/main/java/com/example/first_cockroach/repositories directory.
// PetsRepository.java
//
package com.example.first_cockroach.repositories;
//
import com.example.first_cockroach.entities.Pets;
import org.springframework.data.repository.PagingAndSortingRepository;
import org.springframework.data.repository.query.Param;
import org.springframework.data.rest.core.annotation.RepositoryRestResource;
//
import java.util.List;
import java.util.UUID;
//
@RepositoryRestResource(collectionResourceRel = "pets", path = "pets")
public interface PetsRepository extends PagingAndSortingRepository<Pets, UUID> {
//
List findByName(@Param("name") String name);
}
Step 8: Create Services for Pets
This defines how the Services for Pets. Create the PetsService.java file in the src/main/java/com/example/first_cockroach/services directory.
// PetsService.java
//
package com.example.first_cockroach.services;
//
import com.example.first_cockroach.entities.Pets;
import com.example.first_cockroach.repositories.PetsRepository;
import org.springframework.stereotype.Service;
//
@Service
public class PetsService {
//
private final PetsRepository petsRepository;
//
public PetsService(PetsRepository petsRepository) {
this.petsRepository = petsRepository;
}
//
public Pets save(Pets pet) {
return petsRepository.save(pet);
}
}
Step 9: Time to Run!
Now we can boot and run your application with SpringBoot and CockroachDB! Simply type ./gradlew bootRun to run. You should see the following:
./gradlew bootRun
> Task :bootRun
  .   ____          _            __ _ _
 /\\ / ___'_ __ _ _(_)_ __  __ _ \ \ \ \
( ( )\___ | '_ | '_| | '_ \/ _` | \ \ \ \
 \\/  ___)| |_)| | | | | || (_| |  ) ) ) )
  '  |____| .__|_| |_|_| |_\__, | / / / /
 =========|_|==============|___/=/_/_/_/
 :: Spring Boot ::        (v2.2.4.RELEASE)
2020-02-28 11:22:41.907  INFO 4390 --- [  restartedMain] c.e.f.FirstCockroachApplication          : Starting FirstCockroachApplication on MacBook-Pro-9.local with PID 4390 (/Users/glenn/git/misc_projects_glenn/workshop_java_corelogic/java_gradle_glenn_v1/first_cockroach/build/classes/java/main started by glenn in /Users/glenn/git/misc_projects_glenn/workshop_java_corelogic/java_gradle_glenn_v1/first_cockroach)
...
<=========----> 75% EXECUTING [1m 28s]
> :bootRun
Once it is running, open another SQL session to the database and check to see the table has been created and the initial pets have been added.
cockroachdb sql --insecure
root@localhost:26257/defaultdb> select * from pets;
id                  |  name  |   type   | indoor
+--------------------------------------+--------+----------+--------+
333cf0c1-8245-4b90-9f17-6c059de57fb7 | tula   | cat      |  true
6f61408f-9074-4d00-80ac-2e189aacf62c | virgil | squirrel | false
7e4dfb73-9f3d-4e64-aade-1b7a8457ac51 | ruby   | dog      |  true
ce32bd86-6485-4846-af14-55e66eaf792a | rosie  | dog      |  true
(4 rows)
Now let’s try the RESTFUL interface to retrieve the pet data from http://localhost:8080/pets:
curl http://localhost:8080/pets
{
  "_embedded" : {
    "pets" : [ {
      "name" : "tula",
      "type" : "cat",
      "indoor" : true,
      "_links" : {
        "self" : {
          "href" : "http://localhost:8080/pets/333cf0c1-8245-4b90-9f17-6c059de57fb7"
        },
        "pets" : {
          "href" : "http://localhost:8080/pets/333cf0c1-8245-4b90-9f17-6c059de57fb7"
        }
      }
    }, {
      "name" : "virgil",
      "type" : "squirrel",
      "indoor" : false,
      "_links" : {
        "self" : {
          "href" : "http://localhost:8080/pets/6f61408f-9074-4d00-80ac-2e189aacf62c"
        },
        "pets" : {
          "href" : "http://localhost:8080/pets/6f61408f-9074-4d00-80ac-2e189aacf62c"
        }
      }
    }, {
      "name" : "ruby",
      "type" : "dog",
      "indoor" : true,
      "_links" : {
        "self" : {
          "href" : "http://localhost:8080/pets/7e4dfb73-9f3d-4e64-aade-1b7a8457ac51"
        },
        "pets" : {
          "href" : "http://localhost:8080/pets/7e4dfb73-9f3d-4e64-aade-1b7a8457ac51"
        }
      }
    }, {
      "name" : "rosie",
      "type" : "dog",
      "indoor" : true,
      "_links" : {
        "self" : {
          "href" : "http://localhost:8080/pets/ce32bd86-6485-4846-af14-55e66eaf792a"
        },
        "pets" : {
          "href" : "http://localhost:8080/pets/ce32bd86-6485-4846-af14-55e66eaf792a"
        }
      }
    } ]
  },
  "_links" : {
    "self" : {
      "href" : "http://localhost:8080/pets{?page,size,sort}",
      "templated" : true
    },
    "profile" : {
      "href" : "http://localhost:8080/profile/pets"
    },
    "search" : {
      "href" : "http://localhost:8080/pets/search"
    }
  },
  "page" : {
    "size" : 20,
    "totalElements" : 5,
    "totalPages" : 1,
    "number" : 0
  }
 }
Now let’s test inserting data via POST to the pets application:
curl -i -X POST -H "Content-Type:application/json" -d '{"name": "Mazie","type": "dog","inside": "true"}' http://localhost:8080/pets
HTTP/1.1 201
Vary: Origin
Vary: Access-Control-Request-Method
Vary: Access-Control-Request-Headers
Location: http://localhost:8080/pets/45234458-6468-4d24-8a2d-b0dad6b8881d
Content-Type: application/hal+json
Transfer-Encoding: chunked
Date: Fri, 28 Feb 2020 19:42:24 GMT

{
  "id" : "45234458-6468-4d24-8a2d-b0dad6b8881d",
  "name" : "Mazie",
  "type" : "dog",
  "indoor" : true
}
Finally, we can query to the pets table to ensure the data is stored within CockroachDB.
root@localhost:26257/defaultdb> select * from pets;
id                  |  name  |   type   | indoor
+--------------------------------------+--------+----------+--------+
333cf0c1-8245-4b90-9f17-6c059de57fb7 | tula   | cat      |  true
45234458-6468-4d24-8a2d-b0dad6b8881d | Mazie  | dog      |  true
6f61408f-9074-4d00-80ac-2e189aacf62c | virgil | squirrel | false
7e4dfb73-9f3d-4e64-aade-1b7a8457ac51 | ruby   | dog      |  true
ce32bd86-6485-4846-af14-55e66eaf792a | rosie  | dog      |  true
(5 rows)
Final Thoughts
This was meant as a simple example of how to get started with SpringBoot and Cockroach. If you are developing a highly concurrent application with CockroachDB, you will need to take into consideration coding for Retries with Serializable transactions. This is often done with a retry operation with Springboot to handle this event.
I hope this was useful to show how to get started developing SpringBoot applications that use CockroachDB.
Below is are various links to building Restful applications with SpringBoot, Hibernate, Java, and Gradle. Thanks to Vinh Thai for the guidance with your example and pointers.
Reference Documentation
For further reference, please consider the following sections:
- Official Gradle documentation
- Spring Boot Gradle Plugin Reference Guide
- Spring Boot DevTools
- Rest Repositories
- Spring Data JPA
- Flyway Migration
- Gradle Build Scans – insights for your project’s build
Guides
The following guides illustrate how to use some features concretely:
